keskiviikko 17. heinäkuuta 2013

A DIY shelf out of salvaged wood and books

I came upon some sturdy wood abandoned on the side of the street. So what to do with it? Well of course, a DIY shelf!


First I cleaned the boards with a rag and some water and pulled out the nails that were left in them. Even after the cleaning the boards still had a nice white used look to them.


So I had this empty bit of wall that needed some shelving. I also had some salvaged books lying around so instead of the traditional bricks and plank approach I went on to build a shelf on books. A bookshelf, yo might say.


Just be sure to choose sturdy books and pile them with the biggest in the bottom. Also make sure that the smallest book is wide enough to hold the blanks in place.

And voilá, here it is! I clipped a light onto the side and put some nice things on it. That's it, a shelf that's sure to turn heads. And the price is the best part: $0.


perjantai 12. heinäkuuta 2013

Turn an old book into a paper tray

I love taking an old book and turning it into something else. This time I had some papers around that I needed to hang on to. I needed an inbox, but the plastic paper trays I found in stores didn't feel right. So I grabbed an old book for free at the local recycling center.


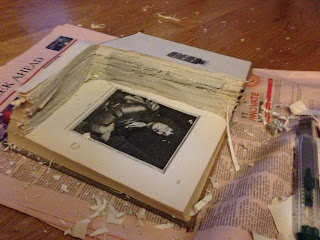
As always, I cut into the book with a box cutter. Just be careful you don't rip the pages as you cut them.  You can glue the pages together before cutting if this feels difficult.


Try hold the first few dozen pages firmly together as you cut. Otherwise they'll rip right off or your later cuts won't be straight.


As you cut further into the book it's harder to keep the cuts straight. In this case it doesn't matter as much, 'cause the insides are really not visible.


Fully cut! I left the last page uncut so it's easier to glue everything together.


Next up: Some universal glue. I use a piece of cardboard to spread it everywhere. If the glue is tough enough, you don't have to get as much in between pages. It's enough to spread it on the sides.


All glued up. Make sure that the pages remain straight and the covers line up. 


Put the book under something heavy (like a concise dictionary of the English language) for a while.


All done! Here's my DIY paper tray holding papers!


View from the front. You could make three of these to have an inbox, outbox and a tray for stuff that's waiting for something.